
Make Your Own
Droplet Clock and
Companion Mirror Project
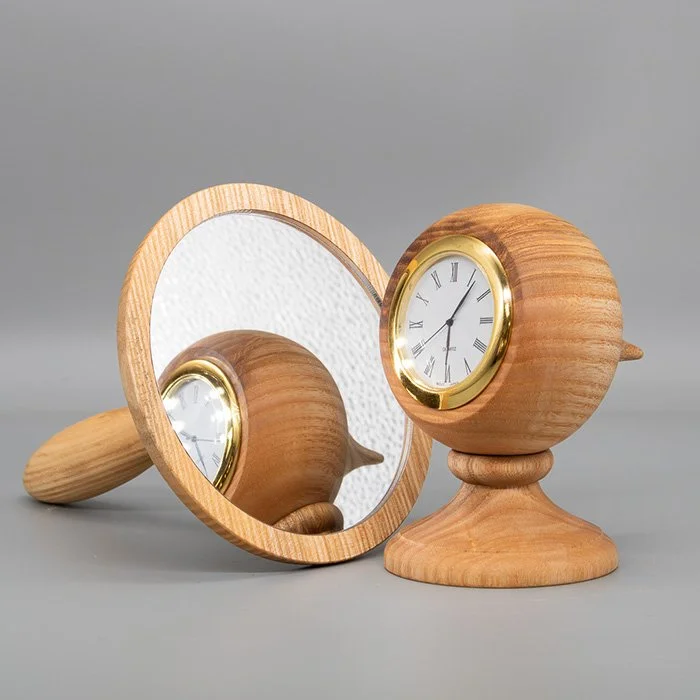
Droplet Clock and Companion Mirror Project

This two part project combines end grain and long grain turning to create beautiful home accents or heartfelt gifts. Imagine giving a His ‘n Hers wedding or anniversary present or a ‘just because’ gift! These pieces are also easy to make for craft market sales.
The clock, crafted from a single piece of wood with spindle gouges, has two parts. The base features a delicate bead, a neat fillet, and a gentle cove leading to a full bead at the top, with a dip for the clock.
The mirror is made using a small bowl blank and a spindle blank. We used a self-adhesive acrylic mirror for the sample. This simple turn creates a charming mirror to pair with the clock.
You Will Need
Aside from your usual kit (including centre finder etc), you will need most of the kit below. Those marked as optional can be substituted for an alternative technique.
A: 165x75mm (6.5x3”) Blank
B: 120x25mm (4 3/4”) Blank
C: 25x25x120mm (1x1x4 3/4”) Blank
D: Woodworm Screw
E: 100mm (4”) acrylic mirror
F: 50mm (2”) clock (⚡)
G: 10mm MDF spacer
H: Vernier Calipers (⚡)
I: 45mm (1 3/4”) forstner bit (optional)
J: 30mm (1 3/16”) forstner bit (optional)
K: Drive centre
L: Live centre
M: Jacobs chuck (optional)
N: Spindle roughing gouge
O: 1/2” Spindle gouge
P: 3/8” Spindle gouge
3/8" Bowl Gouge (not shown)
Q: Les Thorne Multi Purpose Tool (optional)
R: Diamond parting tool
S: Chuck with minimum 2” jaws
Abrasives from 120 - 400 grit
Colours (optional)
Wood Glue
Finishes

This course contains over 90 minutes of video lessons split across different stages for ease of watching and returning to later.
Turn with Martin as explains each process with his usual level of detail and enthusiasm.
-
-
Martin gives an overview of this interesting two-part project.
-
Top of The Base
Find out how to turn the base of clock bottom-first in order to successfully reverse mount it.
Find out how to turn the base of clock bottom-first in order to successfully reverse mount it.
-
Reversing the Base
Reverse mounting the base in this way ensures we can turn the clock part to fit the top of the base nicely.
Reverse mounting the base in this way ensures we can turn the clock part to fit the top of the base nicely.
-
-
-
The Clock Body
Turning the clock body is a lot of fun and involves a lot of tool control to perform the continuous curve of the body shape
Turning the clock body is a lot of fun and involves a lot of tool control to perform the continuous curve of the body shape
-
Reversing the Clock
Create a male jam chuck from the remaining wood on the blank to reverse mount the clock to finish the tail.
Create a male jam chuck from the remaining wood on the blank to reverse mount the clock to finish the tail.
-
-